
Mia Mendoza

Restoration 2


Restoration 1

For this assignment i used the red eye, which is located in the band aid tool. The red eye is like a magic eraser and gets rid of the red in the eye that is in the photo that makes you look evil.
In this assignment we learned how to get rid of blemishes. i used the spot healing brush to get rid of the blemishes,the tool blends the skin color with the pimple.
For this assignment I used the patch tool and the color balance to restore the old picture. the patch tool Is located in the tool bar under the band aid tool. To fix the color balance you go to image, adjustments, and the color balance and you fix the color to your liking, I just fixed the color till the kids skin looked normal.
In this assignment I used the spot healing brush and the clone stamp tool all located in the tool bar. and then I fixed the color with the balance color to make her dress more yellow and her skin tone more natural just by adjusting the color in the image and then in the adjustments and then the color balance.

Restoration 4


Restoration 3

RESTORATiONS

Restoration 5


Restoration 6


Restoration 7


Restoration 8

For this assignment I used the patch tool that's located in the tool bar, I also went to image and then adjustments and fixed the color balance.
For this assignment i used the patch tool that was located under the band aid tool in the tool bar and the clone stamp to restore the original image.
for this assignment I used the patch tool to restore it and then I cropped all the white uneven edge out and then I used the clone stamp tool to restore the bottom of the picture. then I went to image, adjustments, then brightness/contrast to fix the yellowing on the picture and then went hue/saturation and slid the saturation all the way to the left.
for this assignment I used the clone tool, quick selection tool, and the patch tool, and went to adjustments and fixed the contrast and levels all located in the tool bar or the tabs above to fix the hair, add an eyebrow and blend the hair and fix the back ground.

Restoration 9

for this assignment I cropped it get rid of some of the hurt edges and for the rest of the edges I used the clone stamp tool, for the ruined background I also used the clone stamp tool located in the tool bar, and then I fixed the color by going to adjustments and went to brightness and contrast and moved both around till her skin looked normal. and then I sharpened the image also located in filter.


Restoration 10
for this assignment I used the patch tool to get rid of her blemishes and the spot healer tool for the blemishes and the redness on her cheeks and for her discolored teeth which is all located in the tool bar and then I went to image and adjustments and fixed the color balance and hue/saturation of the picture to make her skin look more natural looking skin.
for this assignment I used the clone stamp tool to restore the background and the little girls hair mouth, eye, and arms. then I changed the levels in the adjustments, and the sharpness. the clone tool is located in the tool bar and the levels is located in the image tab, adjustments, and then levels. and then to fix the sharpness you go to the filter tab and then fix the sharpness.
for this assignment I used the clone stamp to restore the background, I also used the patch tool located in the tool bar. then I went to adjustments and restored the color of the picture to my liking. I also used the clone stamp tool and patch tool to restore the faces of the girls and the arms.
for this assignment i used the clone stamp tool for the background and to redraw his arms and to fix his shirt and to add a missing button, i used the patch tool for the face, and then the clone stamp tool to redo his hat, and then i fixed the levels and then i fixed the hue/saturation and turned off the saturation.


Restoration 13
Restoration 11
Restoration 12


Restoration 14
for this assignment I used the clone stamp tool to fix the back ground and the edges to restore the lost parts, and then I copied the background layer, selected the back teeth and moved them to the other side where they were missing, and I did that same step for his top teeth and tongue. and then I went to image and adjustments and fixed the hue/saturation to make him look less sunburned.


Restoration 15
Restoration 16
Restoration 17
Restoration 18
Restoration 19
Restoration 20
for this assignment I used the marque tool and then made a box around the picture and then right clicked to select inverse to make a new border. and then I changed the levels and went to images, adjustments, and turned of saturation. and then I clone stamped the tile, and then I selected a part of the building that wasn't damaged and made a new building in the background
used the clone stamp tool on the grass because it was missing and for the sky I clicked on the paint bucket tool and selected the pitch black areas and made them gray just like the skies original color in the picture. then for all the cracks in the sky and on the floor I used the spot healing tool and made them all disappear and look smoother. also I selected one of the tee-pees and re constructed the tee-pee in the far left of the picture then I did the same thing but with the guys foot. and added in his butt
for this assignment I fixed the levels which is in the image tab, and the adjustments. then I used the band aid tool to smooth out some of the blotchiness, and use the clone stamp tool to add some of the missing image, and then I cropped out most of the ruined edges and all those tools are located in the tool bar. then I went online and found an image of a wedding cake and opened it up in photoshop and cut it out using the polygonal lasso tool, and moved the cutout of the cake to the image of the couple and placed the cake in there, and then I opened up the unrestored image and cutout the candle using the same steps as the wedding cake, and then I went to image and adjustments and hue/saturation and turned the saturation off for the candle, and cake, and the couple to make it black and white.
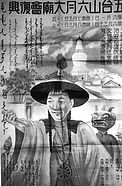
for this assignment I used the smooth tool and the clone stamp tool to get rid of the folds in the poster and to add onto the image and then I went to image, and fixed the levels.
for this assignment I cloned stamped the right side of the background and then I copied that layer and then I used the rectangle marque tool and selected the background and moved it to the other side of the background and I turned the opacity down so I could use the eraser tool to erase the parts of his face the I covered with the new back ground, and then I used the clone stamp tool for his left side of his suit and I used the polygonal lasso tool and turned the opacity down and used the free transform to line it up where his suit was missing and erased the parts I didn't need, and then I used the rectangle marque tool and inversed it and paitned it white to recreate the background, and then I googled a black tie and phtoshopped it in like I did with suit/background
for this assignment I used the patch tool located in the tool bar and the bandaid tool to blend it. then I used the clone stamp tool to fix the border and the back ground, and fix the ball that the little boy is holding. and then I fixed the levels and the saturation of the image that's located in the image tab and filters.